How to master a song
The 7 step mastering formula
If you want to sit back and relax, hit play and watch the video above where I show you how to master a song step by step. If you can’t watch, or you’d prefer to read, check out the page below for a breakdown of my 7 Step Mastering Formula. Enjoy :)
How to master a song – 7 Step Mastering Formula eBook (2nd edition)
Click here to sign up free for my ‘Mastering Mini-Course’ and get instant access to download my ‘How to Master a Song’ eBook which has everything on this page in one convenient PDF :)
Video info – Quick jump guide & plugins used
Intro:
2:45 — What Is Mastering?
3:18 — The 5 Purposes Of Mastering
The 7 step mastering formula:
6:37 — Step 1: ‘Prepare It’
8:06 — Step 2: ‘Fix It’
10:18 — Step 3: ‘Enhance It’
19:12 — Step 4: ‘Compress It’
23:05 — Step 5: ‘Clip It’
25:01 — Step 6: ‘Limit It’
28:53 — Step 7: ‘Reference It’
29:47 — Some Final Tips
Here’s a list of all the plugins used in order:
This is just a list of the plugins I used for mastering in this video, but you don’t have to use the exact same thing. I’ve put the type of plugin in brackets so that you can look for something similar if you like.
1. Waves REQ (Parametric EQ – High Pass Filter)
2. DUY Valve (Valve Emulation)
3. DUY Tape (Tape Emulation)
4. Waves QClone (Parametric EQ – High Shelving Filter)
5. Waves Maxx Bass (Bass Enhancer)
6. Waves SSL Compressor (Compressor)
7. DUY Wide (Stereo Widener)
8. Waves LinMB (Multiband Compressor)
9. T-Racks Soft Clipper (Soft Clipper)
10. Waves L3 (Multiband Brickwall Limiter)
How to master your music in 7 simple steps
If you want your songs to sound their best and to compete with the commercial productions out there, mastering is absolutely essential. The fact is, learning how to master your music properly will dramatically impact every song you put out there.
I’m sure you’ve had the experience of comparing one of your tracks to a big commercial song and being shocked at how weak, thin, and soft, your song sounded in comparison – I’ve been there!
“Learning how to master your music properly will dramatically impact every song you put out there”
When I was trying to learn this stuff it was so frustrating because no one could tell me how to actually master a track. I found plenty of opinions, advice, and technical jargon-filled books, but no simple step by step guide to mastering a song from start to finish.
Long story short, after years of trial and error trying to figure out how the pros do it, I eventually distilled everything I’d learnt into this simple system that finally got me the ‘commercial-quality’ results I was looking for. I call this my ‘7 step mastering formula’.
In the video above and the page below, I show you how to master your songs using this exact same 7 step system. It doesn’t matter what style of music you’re doing, or what plugins you may have or not have, the steps are universal.
I’m going to show you how to master your music to sound just as full, fat, and loud (if that’s what you want) as the commercial records that you love.
If some of the steps seem complicated at first, hang in there. All this means is that you need some more training or practice in this area. Make a note of these things so that you can come back to them later. For now, let’s just focus on the basics and go over the steps of how to master your music.
Sound good? Let’s get started… If you want to sit back and relax, hit play and watch the video above where I show you how to master a song step by step. If you can’t watch, or you’d prefer to read, check out the page below for a breakdown of my 7 Step Mastering Formula.
Contents - How to Master a Song

Sign up free for my Mastering Mini-Course.
Join me for my Mastering Mini-Course where I'll be sharing with you some of my best tips, tricks, and insights, into producing great sounding masters from home. Did I mention it's totally free? :) Click below to sign up now.
Download the 7 Step Mastering Formula Infographic
Get a quick overview and checklist to guide you through the 7 step formula as you’re mastering your songs. Click the big blue button below to download it now – it’s on me :)
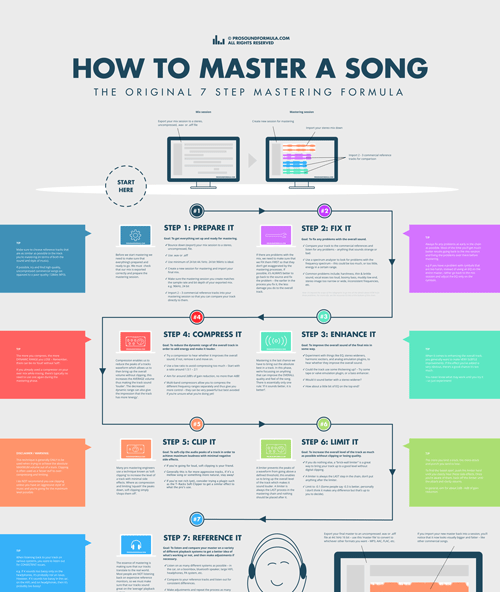
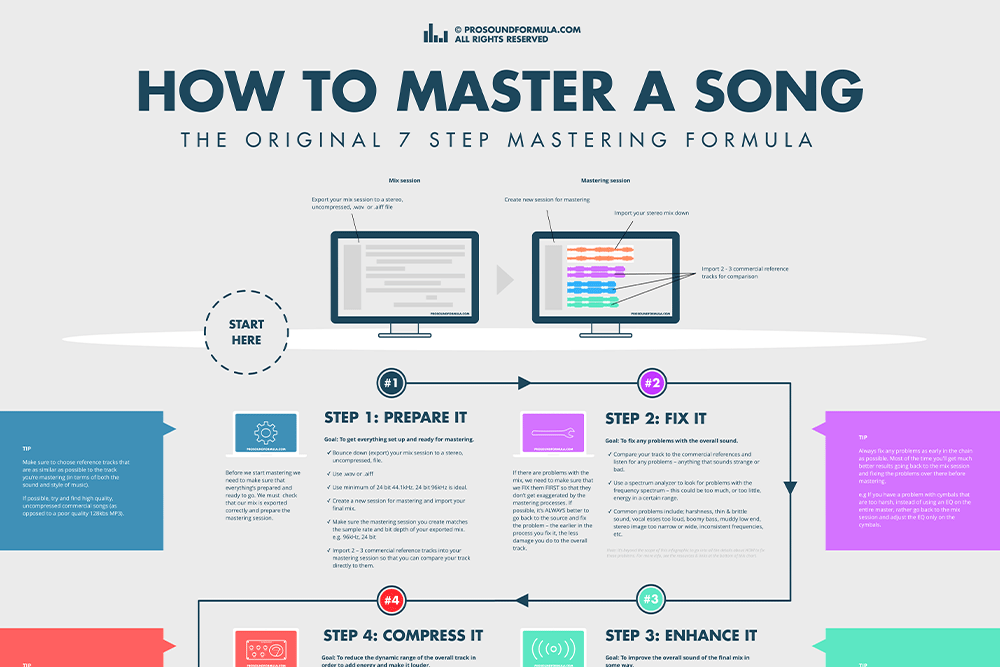
The 7 Step Mastering Formula
Whether they recognize it or not, all the professionals have a set way of doing something, a ‘success formula’ if you will. It’s this system that they use which gets them consistent results over and over again.
Now, of course, every track is different, and the specific effects and settings applied will change from song to song. But the basic steps stay the same.
To avoid any confusion, I just want to make it clear that these steps are not all compulsory. For example, you don’t have to compress (step #4) every master and you may not need to fix (step #2) anything, that depends on the mix.
This method is simply meant to help guide you through the various mastering options so that you know you’ve covered all your bases and got the best master possible.
Try it out and hear what works for you and your music, and then decide for yourself what you want to stick with and what you want to throw out.
![]()
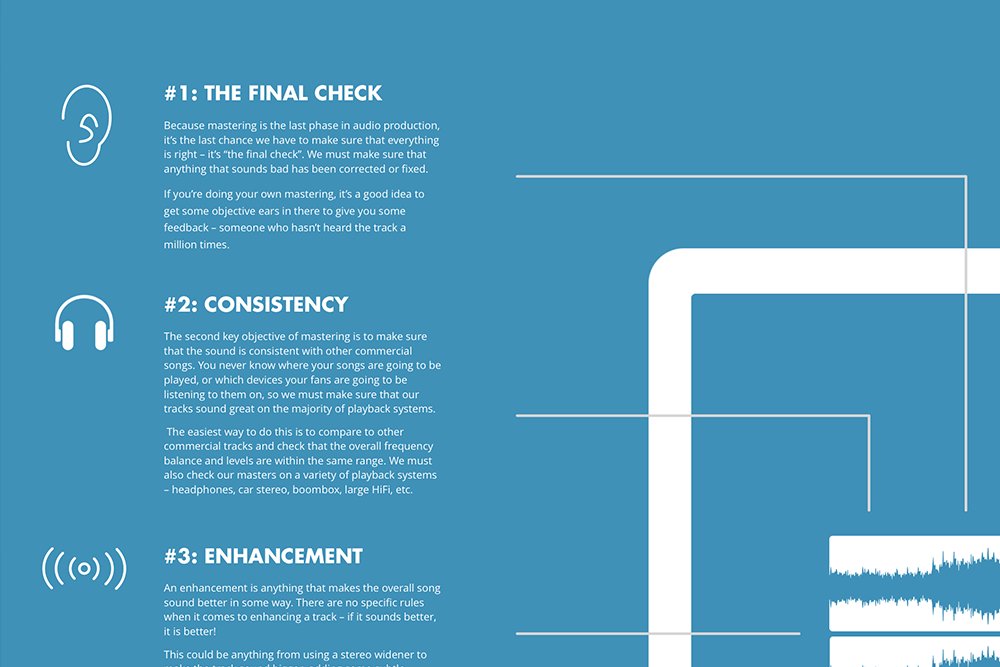
#1. Prepare it
The first step in the 7 step mastering formula is to ‘prepare it’. Before we get going, we need to get the final mix ready for mastering.
Export your multi-track mix to a stereo file
Mastering starts when the mix finishes. It’s important that we export our mix session correctly otherwise it can make mastering a lot more difficult than it has to be.
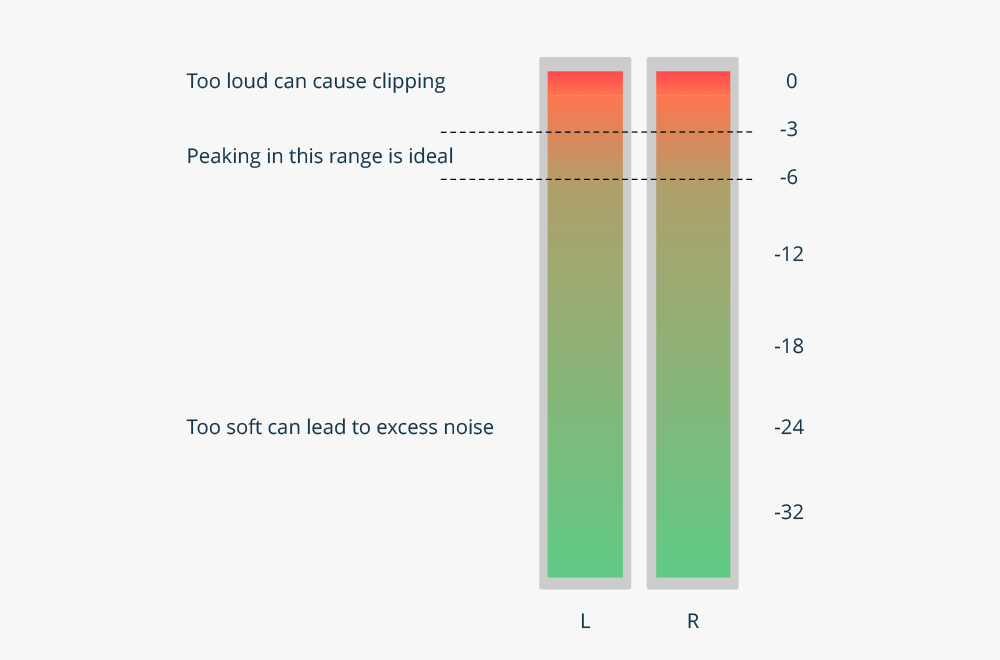
Make sure that you leave at least 3dB – 6dB of headroom when you export your final mix. If you look at the master meter, you want the peaks (loudest parts) to be around 3dB to 6dB below the digital clipping point.
If you export your mix too hot (too loud) there won’t be any ‘room’ for the mastering processes to be applied, so if you need to bring everything down in level a little bit, do that before you export it.
Although mastering is done in many different ways these days, to keep it simple it’s best to export (a.k.a. ‘bounce’) your multi-track mix session to a stereo uncompressed format such as ‘.wav’ or ‘.aiff’.
We want to make sure that it’s kept at the highest resolution possible so that we don’t lose quality as we start to add the various mastering processes.
I like to master at 96kHz, 24bit, as it seems to ‘hold up’ better to the various mastering plugins and processing.
We won’t go into all the technical details here, but basically, every plugin you use requires the computer to recalculate what the audio should sound like. This isn’t a perfect process, and small inaccuracies in these constant re-calculations are what lead to things like noise, distortion, and other unwanted artifacts.
When you use a higher resolution there’s more information contained in the audio file and the computer can be more accurate when processing it. It’s not that it’s making the sound any better, it’s just better at preserving what was there in the first place.
“The important part to remember is just to use the highest resolution audio you can.”
The important part to remember is just to use the highest resolution audio you can.
In case you’re wondering why we wouldn’t always just use the highest resolution settings available…
The biggest limitation is your computers processing power – essentially the CPU. When you work at 96kHz it’s having to do DOUBLE the work than at 48kHz. If you’ve got a big mix session with 80 tracks, and plugins on each track, that’s a lot of calculations the computer’s trying to keep up with!
With big sessions, it’s often not practical (or possible) to record or mix at such a high resolution. However, you can still convert your mix to 96kHz 24bit for mastering – it may not be quite as good, but it does help.
The reason we want to use a high resolution while mastering is because we’re processing the entire track and we want to preserve as much of the quality as possible.
Always use 24 bit (or 32 bit if available). Never master at 16 bit. The only time you should use 16 bit is when you export your final master.
Sample rate doesn’t make as big of a difference as bit depth does, but it can help. Use 96kHz if possible (or higher if you like). If it’s not possible for some reason, 44.1kHz or 48kHz will do just fine.
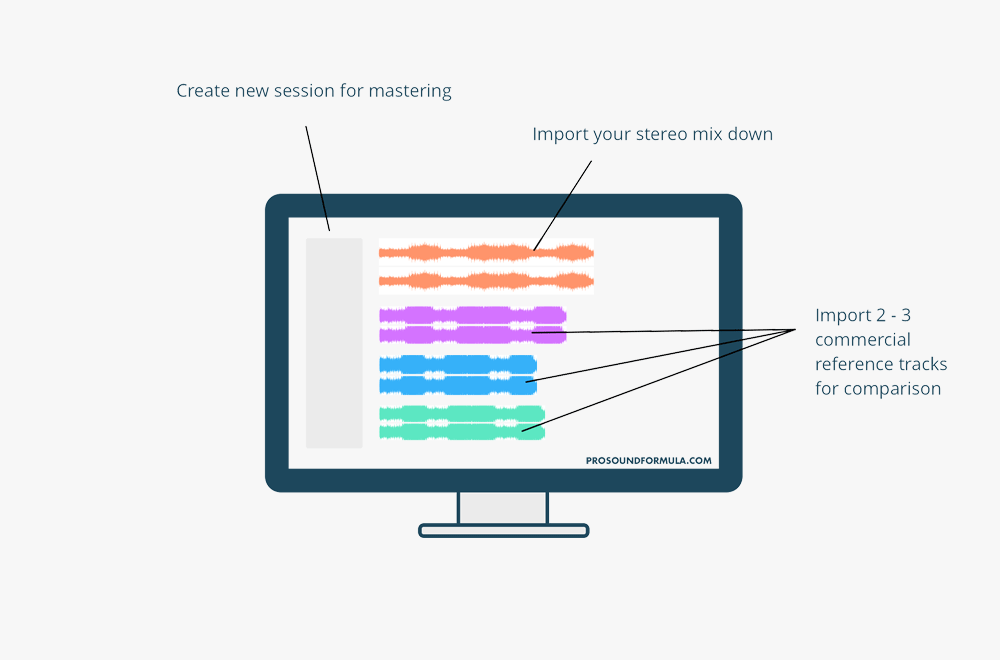
Import 2 – 3 commercial reference tracks
Modeling the masters (no pun intended) is one of the most effective ways to rapidly improve your sound… and by ‘masters’ I mean those who are the best at this in the world.
We always want to be comparing to the best.
“Modeling the masters (no pun intended) is one of the most effective ways to rapidly improve your sound.”
Find two or three commercial tracks that are similar both in composition (the instrumentation and the way it’s played) and in intensity (how mellow or aggressive the track is). You want to import these into your actual mastering session so that you can compare to them directly throughout the process.
The challenge is, our ears get used to hearing something in a certain way and very quickly adapt to it. I’m sure you’ve had the experience of mastering a track and starting to think it’s sounding pretty cool – until you compare it to a big commercial song!
Well, instead of wasting hours tweaking things and hoping for the best, we want to be comparing to commercial references throughout the mastering process so that it keeps us focussed on the ultimate goal.
Sometimes it can be a little discouraging when you’re constantly comparing to the very best in the world, but stick with it. If you can even get close to the best, it’ll be way better than most of the mediocre stuff out there.
Here’s a quick summary:
- Export your mix session with at least 3dB – 6dB of headroom (i.e. Peaking at 3dB – 6dB below digital clipping).
- Import 2 – 3 commercial reference tracks that are similar in style and composition to the song you’re mastering.
- Bit depth – Use 24bit (or 32 bit if available). Never use 16 bit for recording, mixing, or mastering. Only use 16 bit for your final mastered export.
- Sample rate – Use 96kHz (or higher if you like). If your computer struggles to keep up, use 44.1kHz or 48kHz. Sample rate doesn’t make as big of a difference as bit depth does, so don’t worry about it too much.
![]()
#2. Fix it
Step two is to ‘fix it’. Before we try to improve the sound in some way, we must first fix any problems so that we’re building on a solid foundation.
Confucius says, ‘You can’t polish a turd’ …Ok, so maybe it wasn’t Confucius, but it was a wise man indeed.
If you’re not familiar with this saying, all it means is that no matter how much you try to fix and ‘polish’ a bad sounding mix / recording / song etc, it’s still bad! It’s still ‘a turd’.
Although there’s a lot of truth to this, there is a lot we can do to fix various problems in the mastering phase. The first step is learning to spot these issues in the first place, so let me give you a couple of common examples:
Excess noise – Especially at the beginning and end of a song, and in any quiet gaps.
Distortion or digital clipping – Unfortunately, there’s not much you can do about this in the mastering phase. Try and find the problem in the mix session if possible.
Low-end rumble – Sometimes using an EQ with a high pass filter (low-cut) can help.
Harsh esses or cymbals – Try a de-esser, or an EQ cut around 3kHz – 8kHz.
A mixture of dull and bright elements – This one’s tricky, because using an EQ to fix one problem will make the other problem worse. If possible, go back to the mix.
Over compressed – You can’t undo compression so rather use less compression than you think you need during mixing.
It’s beyond the scope of this short post to go into the ‘cures’ for all these problems, but just start to look out for them so that you can catch them earlier on in the production process.
In general, the sooner in the chain you fix a problem, the less compromise you have to make later on.
“The sooner in the chain you fix a problem, the less compromise you have to make later on.”
For example, let’s say that you have a problem with the cymbals sounding too harsh. You could use an EQ in the mastering phase to reduce the high frequencies, but you’re going to be compromising all the other instruments in the mix – including the vocals which may then sound too dull.
It’s far better to go back to your mix session and put the EQ directly onto the cymbal track so that it’s only affecting the cymbals and nothing else.
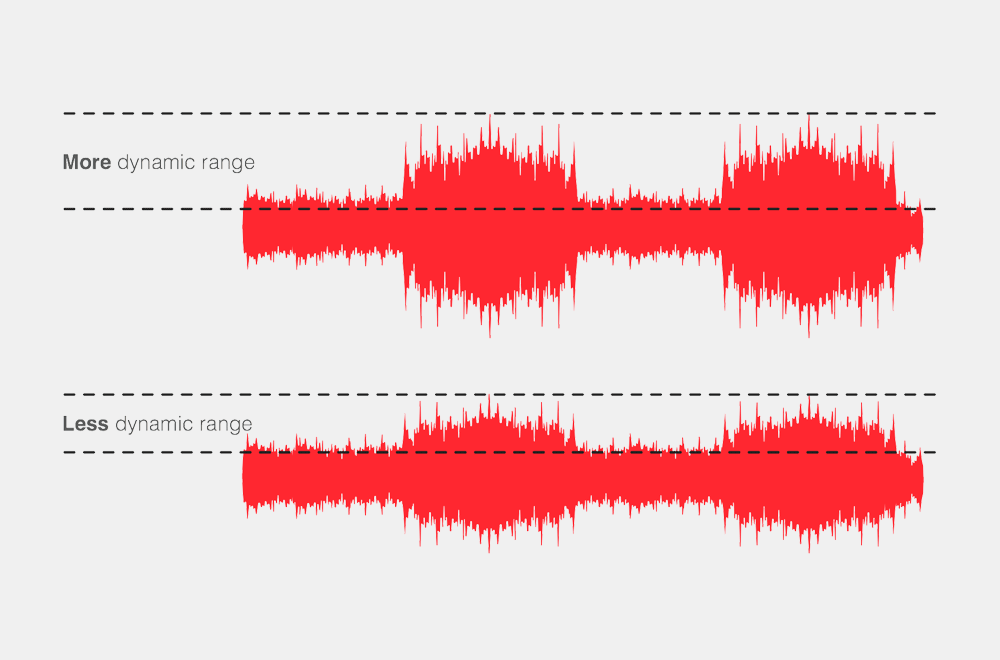
Get The Ultimate Mastering Formula
If you're serious about producing great sounding music, and you want to learn to master your tracks properly, I've got a great in-depth mastering training which I really think will help you. From setting up your mastering session to laying out your final album, everything you need to know to produce commercial quality masters is in here. Click below to find out more.
I want to share with you that I purchased a home recording tutorial about two weeks ago for $99, and I purchased another about a month ago for $197, and your course is so simple and easy to understand, it is packed with useful information, that after two hours into it, I’ve already learned more than I’ve learned from the last two programs I purchased combined.
I’ve invested upwards of $2000 chasing after “the” home recording course that promises to take you from idea to finished product, sadly most of it is hype and repetition, and I wish I had discovered you earlier. Please keep up the excellent work you are doing. There are many of us who need what you offer.”
Geoff
![]()
#3. Enhance it
The third step in the mastering process is to ‘enhance it’. An enhancement is anything that makes the overall track sound better.
One of the
Because sound is so subjective and dependent on the style of music, there’s no way for me to say, ‘These are the things you must do every time!’ But to get you started, I’m going to give you some examples of common processes that are used during mastering. You can go and try them out for yourself and see (hear) if they work for you.
Some plugins and suggestions you can try are:
EQ – Can make a track sound clearer, brighter, warmer, fuller, etc. For example, often a slight top end shelf boost can make a track sound more ‘open’ and ‘airy’.
Valve emulator – Adds a bit of thickness in the low end.
Tape emulator – Adds subtle saturation and distortion which can make your master sound more ‘analog’.
Compressor – Can help ‘glue’ the track together and make it sound more consistent.
Bass Enhancer – Good for making the bass more prominent on a variety of systems, especially if it’s lacking on smaller speakers.
Reverb – A very small amount of reverb can help create a subtle sense of ‘space’ around a track.
Stereo widener – If a track sounds too narrow or you want to make it sound a little larger than life.
Exciter – Makes your track sound brighter and edgier by adding harmonics.
Less is more
Now, a little word of advice, when it comes to mastering… LESS IS MORE!
In mastering, we’re processing the entire track, so we don’t want to go too crazy with any one process or effect. It’s important to keep in mind that there really is no ‘silver bullet’ when it comes to mastering, or producing music in general. There’s no one plugin that’s going to transform your track from the proverbial frog into a prince.
“In mastering, we’re processing the entire track, so we don’t want to go too crazy with any one process or effect”
If you find yourself making big adjustments trying to make up for something that’s lacking, that’s usually the sign that you need to go back and rework the mix.
It’s all the small, incremental improvements, that add up in the end to make a BIG impact and improvement to the sound. So, focus on making small improvements and very subtle enhancements with each plugin you use.
Keep it simple
Along the same lines, don’t fall into the trap of trying to use all 56 plugins you own all at once. (I know, it can be very tempting)
It’s easy to think that if each plugin is improving the sound a little, then adding more plugins must be the answer to life. But of course, just because you’re adding something doesn’t mean that it’s getting better!
Keep it simple. Try as many things as you like, but don’t feel like you need to keep all of them. I like to put on a bunch of different plugins and then bypass them one at a time to hear whether they’re actually making a real improvement or not.
If you’re not sure where to start, try asking yourself questions about the sound.
e.g. ‘What is this track lacking?’ – Maybe it sounds a little thin – so you try some valve emulation or a bass enhancer. Or, perhaps it sounds a little dull – try an exciter plugin; or a high-shelf boost on your EQ.
The golden rule of enhancement is simple: ‘If it sounds better, it is better‘.
![]()
#4. Compress it
Step four in the 7 step mastering formula is to ‘compress it’. Compression can help us make louder, more energetic sounding masters.
Compression allows us to make the overall track sound louder. It can also add a sense of ‘energy’ and ‘power’ to the mix.
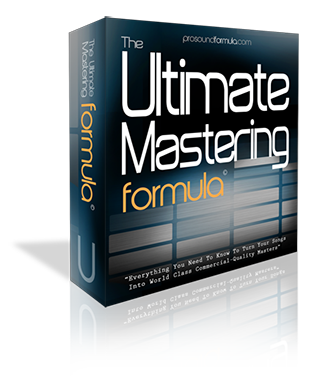
The fact is, we’re not really making the track any louder, we’re just making the peaks (those sticking out parts you see on the waveform in your sound editor) softer. When we stop the peaks from ‘jumping out’ so much, we can now bring up the overall level of the track without it clipping.
So we’re essentially making the average level louder – which sounds louder to our ears. This is known as ‘reducing the dynamic range’ of a track. It’s a fancy sounding term which basically just means making the loud parts and soft parts closer together in level. Take a look at this illustration below to get a better idea of what dynamic range is:
I’m just going to be totally honest with you – when you’re starting out, compression can be confusing. If you don’t know what you’re doing yet compression can easily do more harm than good to your tracks. Of course, that shouldn’t stop you from playing around and experimenting, but I’d really encourage you to learn how to use compressors properly because they’re such an important part of modern music production.
Compressors come in all shapes, sizes, colors, tones, speeds, etc. We’re not going be able to get into all of that here, but I am going to give you some key points and some go-to settings to get you started using compression in your mastering chain…
Key points for using mastering compression
- Compression is optional, it’s not essential to a great sounding master. If you’re totally clueless about compression rather leave it out for now.
- If you’ve used compression on your mix buss while mixing, you shouldn’t need to use compression again during mastering – you’re essentially doing the same thing.
- Keep it very subtle! The quickest way to make your master sound like an amateur demo is to over compress it. Aim for about 1 – 2dB of gain reduction, 4dB at the absolute most.
- Since we’re processing the entire track, be careful of using compressors that ‘color’ the sound too much during mastering – unless you really love the color :) Certain valve / tube-modeled compressors can do this.
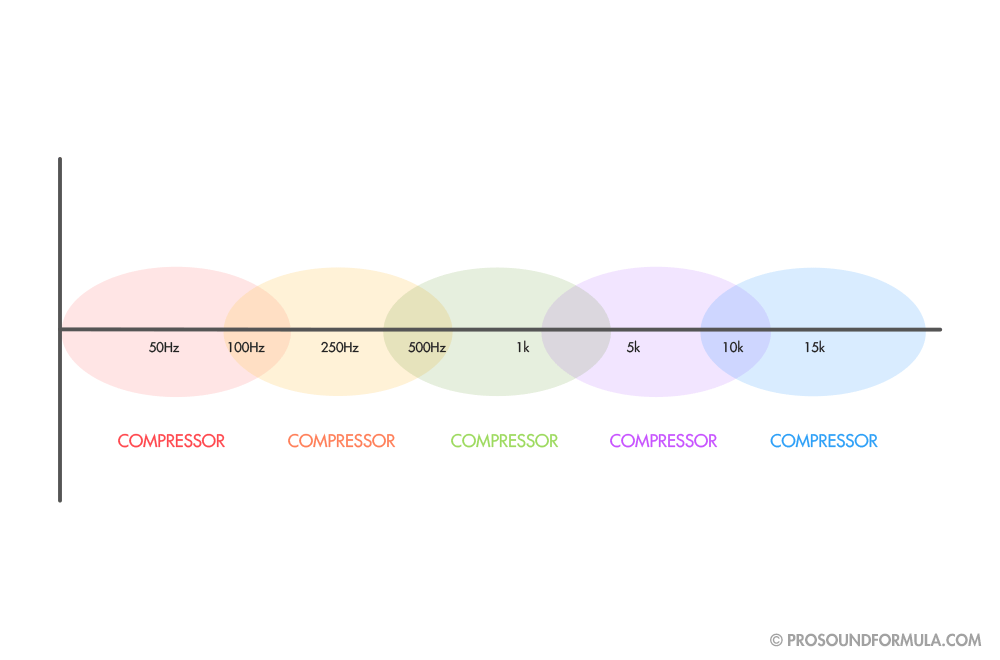
What about mastering with multi-band compressors?
A multi-band compressor is like a regular compressor on steroids – it’s sort of like an EQ and compressor combined. While your standard compressor processes the entire track as one sound, a multiband compressor breaks up the frequency spectrum into several parts and enables you to compress each part differently.
Let me give you a practical, real-world mastering example, to help you understand how you’d actually use a multi-band compressor…
“A multi-band compressor is like a regular compressor on steroids…”
Let’s say that you’re mastering a song that has a powerful kick drum peaking out of the mix. If you set up a regular compressor to reduce those peaks, each kick drum will cause the compressor to bring down the entire level of the track at that point. The vocals, the guitars, the pads, the bass – they all get affected.
Using a multi-band compressor we have more control.
Because a kick drum has most of its energy in the low-end of the frequency spectrum, we can tell the multi-band compressor to compress the low-end fairly aggressively so that it sounds fat, tight, and consistent.
At the same time, we can use more a more gentle compression for the mid-range and high frequencies so that the vocals and other instruments sound natural and not overly compressed.
To see how I set up my multiband compressor, watch my video ‘How to Master a Song’ if you haven’t done so already.
Mastering compression settings
Whenever you ask the ‘pros’ for specifics you tend to hear a bunch of ” ‘ums’, ‘ahs’, and ‘well that depends…’ “. Sure, it always depends on something or other, but this isn’t very helpful when you’re starting out and just want some basic settings.
So, let me give you some go-to mastering compression settings to get you started. In fact, I’m just going to give you one of the ‘cheat sheets’ right out of my Compression Made Simple program. You can use this as a reference when mastering your tracks.
These are the basic settings I use when compressing my overall mix buss, or while mastering a song.

Download the mastering compression cheat sheet (it’s free!)
If you just want my go-to mastering compression settings without the download, here they are:
- Attack: 1ms – 30ms (Fast attacks sound smoother, slower attacks sound punchier)
- Release: 100ms – 1s / Use “auto release” if available
- Ratio: 2:1 – 4:1
- Gain reduction: No more than 1dB – 4dBs
Compression Made Simple
If you don't understand exactly what the various controls on a compressor are doing, chances are, you're doing more harm to your songs than good.
Compression is a powerful tool that allows us to bring out the energy, power, punch, and nuances in a track. Learning how to use it correctly is an essential part of producing modern music.
If you're ready to master this skill and you'd like a simple, step by step guide, check out my 'Compression Made Simple' program where I'll show you exactly how to use the power of compression to bring out the best in your tracks. Click below to find out more.

![]()
#5. Clip it
The 5th step to mastering your songs is to ‘clip it’. If you like it loud, clipping is your friend!
Have you ever compared one of your tracks to some insanely loud record and just shook your head in disbelief? Wondering, ‘How the hell do they do that?!’ It just seems impossibly loud, doesn’t it?
Well, I’m gonna let you in on one of the sneaky techniques right out of the mastering engineer’s playbook – clipping.
Clipping is one of the ‘secrets’ the pros use to create some of the loudest masters you’ve ever heard. If you like it LOUD, clipping is your friend. Or, more accurately, ‘soft clipping’. (Hang in there, I’ll explain that soon)
“Clipping is one of the ‘secrets’ the pros use to create some of the loudest masters you’ve ever heard.”
Now, clipping is generally associated with being a negative thing, something we’re always trying our very best to AVOID. So, why in the name of all things good and holy would we want to put something like this on our entire track??
Good question. Let’s take a step back and look at what clipping actually is, and it’ll start to make sense.
Good clipping vs bad clipping
Basically, there are two types of clipping. You get GOOD sounding clipping, and BAD sounding clipping.
Bad sounding clipping has a harsh, ‘clicking’ sound to it. It’s the type of clipping you hear when you sing into a mic and the preamp is turned up way too high – it doesn’t sound good.
The worst sounding clipping is pure digital clipping. Digital is far less forgiving than analog because every sound you hear is really just a series of ‘zeros’ and ‘ones’, it’s binary.
A regular section of recorded audio may look something like this on the binary level:
001110101001101101010110110101100101010111
What does digital clipping look like? Something like this:
000000000000000000000000000000000000000000
In other words, a computer doesn’t have a value for an audio signal that goes above digital ‘0’. Once the signal goes above ‘0’ you’re in no man’s land, it’s just a string of numbers that doesn’t sound very good to human ears.
This is generally known as ‘hard’ clipping or ‘digital clipping’. The rule of thumb is: Hard clipping should be AVOIDED at ALL phases of the recording, mixing, and mastering process.
“Good clipping, or ‘soft clipping’ as it’s known, adds harmonics which generally sound pleasing to our ears.”
OK, so then where does clipping fit into mastering? And what is good clipping? Glad you asked!
Good clipping is any type of clipping that sounds good. If you plug in an electric guitar and throw on some overdrive – that’s some good sounding clipping you’re hearing.
Good clipping, or ‘soft clipping’ as it’s known, adds harmonics which generally sound pleasing to our ears.
Before I go on, let me just put a small disclaimer in here:
All sound is SUBJECTIVE and I’m not saying that clipping is good or bad. One man’s music is another man’s noise! As a general rule, soft clipping works on more aggressive styles of music such as rock or metal, but should be avoided on more natural, mellow styles… I can’t imagine ever wanting to clip a mellow acoustic track or classical number.
With that said, soft clipping can be used in the mastering phase to squeeze out that extra little bit of volume you may be looking for. The pros tend to use very expensive analog to digital converters which happen to have some fancy built-in circuits which prevent digital overloads.
It didn’t take long for certain mastering engineers to figure out that overloading the converters would activate the soft clipping circuit, and increase the level of the music in a ‘good sounding’ way.
Still confused? Instead of me spending another thousand words trying to explain clipping, let me just show you this picture…

So, by now you may be thinking… ‘That’s all great Rob, you’ve just told me about something which sounds extremely complicated, and I can’t afford anyway!’
Hang on a second…
Now that we know what the mastering pros are doing, we can try to mimic that using some kind of plugin. And, it just so happens that there’s a plugin that’s relatively affordable, and does exactly what we’ve been talking about.
The T-Racks Soft Clipper
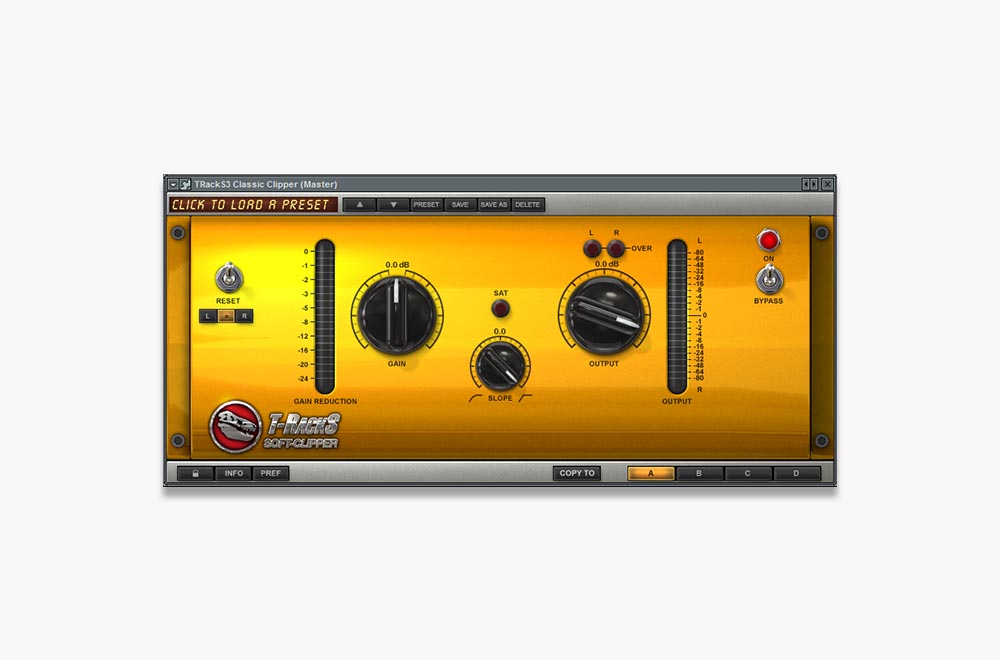
As the name implies, the T-Rack Soft clipper is a… well, exactly that – a soft clipper. I’ve personally used this plugin and gotten a lot of success from it over the years.
It’s simple to setup, and if used correctly can give you that extra level you’ve been looking for with minimal side effects.
While it may never live up to something that costs a hundred times its price, it certainly does the job, and will fool 99% of people (i.e. ‘Your fans’).
If you want to find out more about the soft clipper plugin and check the current price, here it is: T-RackS Soft Clipper
They also offer it in a few different bundles. The Classic bundle gives you an EQ, compressor, and limiter, along with the clipper. I’ve gotten great results mastering with nothing but the T-rackS Classic bundle (which is the cheapest bundle that the clipper is included in).
You can find out more about that over here: T-RackS Classic bundle
WARNING:
EXCESSIVE CLIPPING MAY BE HARMFUL TO YOUR (TRACK’S) HEALTH. SIDE EFFECTS INCLUDE, BUT AREN’T LIMITED TO: DISTORTION, HARSHNESS, LOSS OF PUNCHINESS, AND POSSIBLE DEATH (TO YOUR SONG). USE WITH CAUTION!
![]()
#6. Limit it
The sixth step is to ‘limit it’. Limiting is the final process applied to all masters to bring them up to ‘commercial level’.
A limiter can help you to make your masters as loud as possible – without clipping. It can also help to ‘glue’ a track together, making it sound more like one piece of music instead of a collection of instruments.
Even if you do absolutely nothing else during mastering, make sure that you use a limiter. In fact, if the mix is really good, often the only thing you need is a limiter to finish off your master.
So, how exactly does a limiter work? (I hear you ask) Let me give you a metaphor…
“Even if you do absolutely nothing else during mastering, make sure that you use a limiter.”
Cars have rev limiters fitted to them to prevent ______ (enter idiots name here) from blowing their engine and then trying to sue the car company. A rev limiter basically limits the revs from getting too high and causing some serious damage.
Audio limiters prevent sound from going higher than a certain point and causing digital clipping – we call that point the ‘threshold’.
Digital clipping happens at 0dB. As far as digital audio is concerned, there is no value for anything above 0dB, so it just outputs a harsh clipping sound which we always want to avoid.
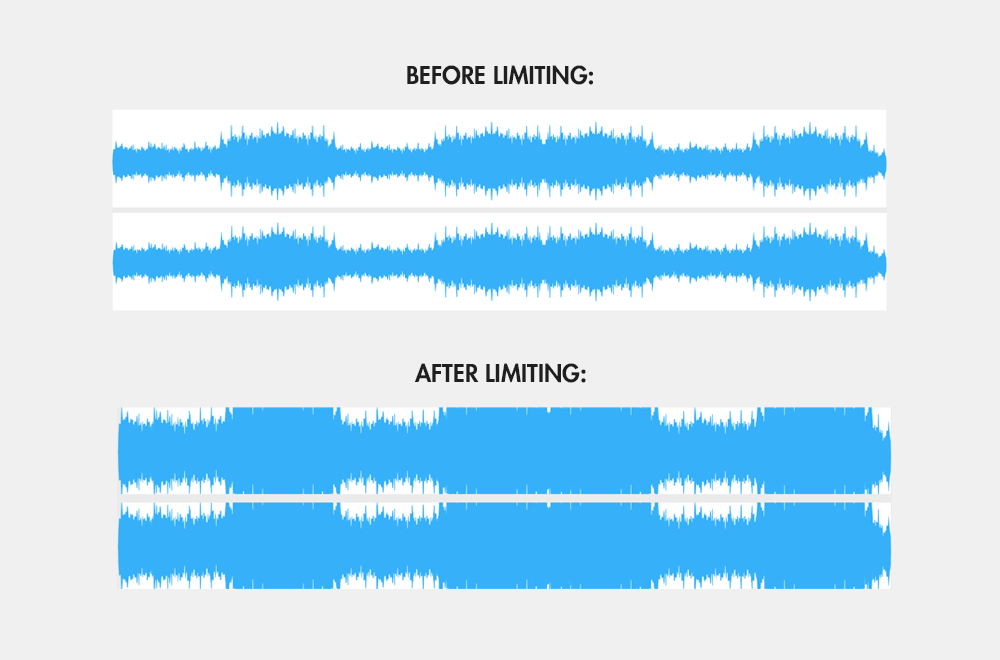
However, we also want our masters to sound loud – or at least in the same volume range as other commercial masters. The problem is, if we bring up the overall level of a track, the audio peaks (those sticking out parts you see on an audio waveform) are going to start clipping.
So, what do we do? Simple, we put on a limiter.
A limiter allows as to bring up the overall level of the track without letting the peaks clip. Magic! Now, if that sounds too good to be true, you’d be right… there are side effects which we do need to watch out for.
Now of course, like anything, there is a limit (no pun intended) to which we can push a limiter before it starts sounding obviously compressed.
The more we limit a track, the more the peaks get ‘squashed’ down into the mix. Drums and percussion are typically most affected by this and will start to lose their attack and punchiness.
Mastering limiters
The type of limiter we want to use for mastering is known as a ‘brick-wall limiter’. It’s called that because it doesn’t allow anything past it!
“A brick-wall limiter doesn’t allow any sound to cross the threshold, which means you can set it to just below the clipping point.”
Basically, you get many types of limiters and they’re all doing a similar thing, but some are more aggressive than others. Some limiters still allow part of the sound to still cross over the threshold.
A brick-wall limiter doesn’t allow any sound to cross the threshold, which means you can set it to just below the clipping point.
There are loads of great mastering limiter options out there. Basically, any type of brick-wall limiter will do.
The limiters I use at the moment are either the Waves L2 or L3. I really like them because they’re quite transparent and don’t make the track sound obviously compressed (as long as you don’t push it more than about 4 – 5 dB’s of gain reduction).
Mastering limiter settings
Firstly, a limiter should always be the very last process applied during mastering.
I set my limiters threshold to just below digital zero, ‘-0.1’. This means that no sound is going to go past this level.
If I’ve already used clipping, I generally aim for about 2dBs of gain reduction – because the peaks have already been ‘chopped off’ to a certain extent.
If I haven’t used clipping, I’ll go for about 2dB – 4dB of gain reduction. After that point, you tend to get serious side effects which aren’t worth the extra level you’re gaining.
Get The Ultimate Mastering Formula
If you're serious about producing great sounding music, and you want to learn to master your tracks properly, I've got a great in-depth mastering training which I really think will help you. From setting up your mastering session to laying out your final album, everything you need to know to produce commercial quality masters is in here. Click below to find out more.
What’s the difference between clipping and limiting?
Simply put, soft clipping ‘chops off’ the peaks, while limiting ‘squashes’ the peaks.
Clipping adds harmonics and subtle distortion to the peaks, making them sound more aggressive (which can be good for aggressive styles of music). Clipping doesn’t affect the rest of the sound, only the peaks are clipped.
Limiters react to the peaks by squashing down the overall level of the track whenever a peak crosses the threshold. The good ones do this so well that you can hardly notice it (as long as you don’t push it too far), but it’s still affecting everything.
In most cases, limiting is the better option. However, if you’re mastering an energetic, upbeat style of music, and you want the absolute most volume possible, soft clipping can help to do that without losing as much percussive attack as you would using only a limiter.
![]()
#7. Reference it
The final step to mastering your music is to ‘reference it’. Referencing is about taking your track out into the real world and hearing how it sounds on a variety of playback systems.
If you want to make sure that your songs sound great no matter where they’re played, and what they’re played on, referencing is the key.
It doesn’t matter whether you’re just starting out, or you’re a seasoned pro with years of experience under your belt, referencing is essential to making sure that our masters sound great out in the real world – not just our home studios.
“Referencing is really just a fancy word for ‘go listen and compare your masters on a bunch of stuff’ “
Referencing is really just a fancy word for “go listen and compare your masters on a bunch of stuff”.
A good analogy for this can be found in web design. Let’s say you’re a web designer… You’re working on your big 27-inch thunderbolt display, designing the most beautiful looking web page the world has ever seen. You sit back and stare it in wonder, thinking ‘look at how clever and talented I am to design such a marvel’.
The problem is, most people are NOT going to be looking at your website on a 27-inch thunderbolt display!
They may be on their iPad, a laptop, their Samsung Galaxy, a 17inch monitor, an old iPhone 3, a Nokia 3310 – Ok, hopefully not the 3310, but it literally could be anything…
The point is, every device, every platform, every browser, all look and behave slightly differently. As you can imagine, this can be a challenge (as I discovered putting together the site you’re on now!). The only way to truly test this out is to check the site on as many different platforms and devices as possible and make adjustments and compromises.
The same is true for your music. Just because your master sounds great in your home studio or on your headphones, doesn’t mean it’ll be the same in a car, on a large HiFi, or on a crappy little boombox. You are the only person who is ever going to listen to your music on your exact system, everyone else is using something different.
One advantage the big mastering houses have over ‘the little guy’ is convenient access to a whole bunch of different playback systems in one place.
Often they’ll have entire rooms filled with a variety of different speakers, sound systems, and reference monitors, so they can instantly listen back and compare the sound on many different sources. The reason this is important is because ultimately we’re trying to make sure that our masters sound great no matter where they’re played or what they’re played back on.
Although you may not have an entire room of your house dedicated to referencing you masters, we can do this the old school way.

There’s no secret to this step, you simply want to burn your master to a CD, or put it on some kind of player, and go and listen to it on as many different systems you can get your hands on. Everything from small portable stereos, the car, a laptop, headphones, a PA, HiFi with a subwoofer, PC speakers, iPod, etc.
Make sure to compare it to the two or three reference tracks you used for comparison in your mastering session. Because all systems sound different, you want to get an idea of what some professionally mastered commercial tracks sound like on them before judging your own.
Look for patterns
What we’re looking for are patterns – consistent differences or problems with the audio.
For example, if you notice that your master sounds harsh on four out of five of the playback systems you test, chances are, it’s got too much energy somewhere in the 2kHz – 8kHz range.
“Every decision made while mastering a song should be about what’s best for that song as a whole.”
On the other hand, if you find that the low-end sounds good on most systems except for your laptop, chances are, this is probably just because the laptop can’t reproduce much bass!
The point is, don’t jump to conclusions based on one playback system. Use your reference tracks to get an idea of what a commercial master should sound like on a particular system, and then listen to how your masters compare to that.
Keep in mind that you can only do so much in the mastering phase and that if the bass wasn’t mixed loud enough, or at the right frequencies, you may not be able to fix it with one overall EQ. As I mentioned earlier, it’s often better to go back and fix issues like this in the mix session.
This is the great part about learning to master – it teaches you so much about what you need to be aiming for in the recording and mixing stages.
Mastering is the art of compromise. It’s about the overall song and making it the best it can be, not about making an individual instrument sound great at the expense of everything else. Every decision made while mastering a song should be about what’s best for that song as a whole.
Three playback systems that make mastering easier
While going out and listening to your masters on a bunch of different systems is important, it can also be a bit of a hassle – especially when you have to keep on coming back and making changes.
I like to have at least three different playback systems / speakers / devices right in my studio and ready to go, so that I can quickly switch between them. If this sounds complicated, it’s not!

Firstly, I have my studio monitors. At the moment, I’m using some relatively inexpensive (as monitors go) Yamaha HS80’s. They’re not the best in the world, but they do a great job and I’m happy with them.
You may be able to record (or even mix) without proper reference monitors, but when it comes to mastering, you’re going to find it extremely difficult to hear what’s really going on unless you have a set of decent monitors.
Mastering without studio monitors is kind of like trying to paint in the dark. If you can’t hear what’s really going on with the sound, it’s very difficult to make accurate judgements.
You don’t need the best or most expensive monitors, you just need some basic studio monitors that will help you hear what’s really going on, and aren’t going to hype the sound like most consumer HiFi speakers and headphones do.
Check out the HS80’s on Amazon: Yamaha HS8 Studio Monitor, Black

Secondly, I always have some headphones on hand. I’m actually using some real ‘el cheapo’s’ – these Sennheiser HD 201’s. You don’t need anything fancy, but you do need some headphones to be able to pick up the finer details and stereo balance which is more difficult to hear on monitors. I also like to keep my Apple EarPods around as another reference.
Check out the Sennheiser headphones on Amazon: Sennheiser HD 201 Lightweight Over Ear Headphones
Here’s the newer version of those headphones (the 202’s) which only cost slightly more: Sennheiser HD 202 II Professional Headphones (Black)
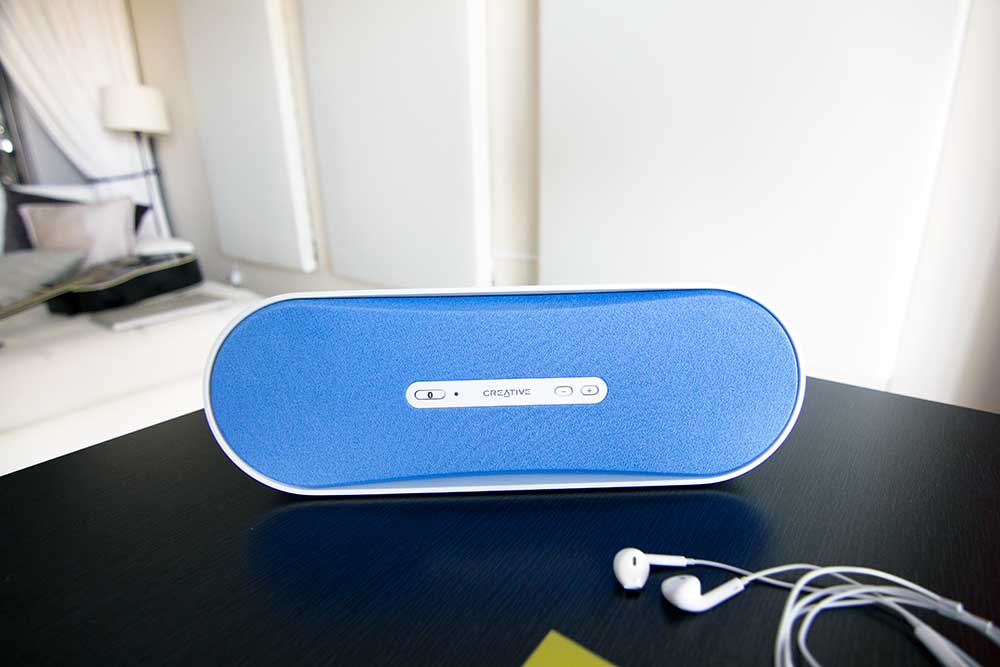
Finally, I have a Bluetooth speaker which I’ve linked up to some extra outputs on my audio interface. I’ve used all kinds of things over the years, but the concept is the same – have something to represent the small boombox type systems out there.
The one I’m using at the moment is this Creative audio Bluetooth speaker pictured above. It just gives you a good general representation of the ‘average system’ people are listening on these days. It’s really affordable and does a good job. It also has a mini-jack input so you can plug straight into it from your sound card if you like.
If you want to check it out on Amazon, here it is: Creative D80 Wireless Bluetooth Speaker (Black)
Summary checklist

Want to improve your masters? Sign up free for my Mastering Mini-Course.
If you’ve been looking to improve your masters, and you found the video above helpful, sign up for my Mastering Mini-Course where I’ll be sharing with you some of my best insights into producing great sounding masters. I’ll also send you my ‘How to Master a Song’ eBook that goes along with the video you just watched. Best of all, it’s 100% free :) Click the button below to sign up now.
Learn more…

Mastering Your Music – The Essential Beginner’s Guide
Learn what mastering is, why your songs should be mastered, and how mastering can transform the sound of your tracks and give them that ‘commercial quality’ sound.
The 5 Purposes of Mastering
There are essentially 5 things we must accomplish to get a complete, commercial quality, master. Before you can learn HOW to do something, you must know WHY you are doing it so that you know what you’re going after.
How to Master a Song – Simple 7 Step Mastering Formula
Learn how to master your songs using my simple 7 step mastering formula. Make your masters sound loud, fat, and full, just like your favorite commercial tracks…
Full disclosure: Some of the links on this site are 'affiliate links'. This means that if you click on them and buy something, the company throws me a few bucks to thank me for the referral. You DON'T pay any more for using these links! I only recommend products that I've used personally and believe in. If you think I'm an evil capitalist and don't deserve the commission, feel free to Google the products yourself and I'll receive nothing… but that wouldn't be very nice of you. Either way, we can still be friends.