How to EQ Vocals
The simple 3 step formula
If you want to sit back and relax, hit play and watch the video above where I show you my simple 3 step process for EQing your vocal tracks to sound clear, professional, and stand out in the mix. If you can’t watch, or you’d prefer to read, check out the page below for a breakdown of the 3 step vocal EQ formula. Enjoy :)
Download the ‘How to EQ a Vocal’ Infographic
Get a quick overview of the 3 step formula for EQing your vocal tracks. Click the big green button below to download it now – it’s free :)
3 Steps to EQing your vocals
For the average listener, the vocals are the most important part of a song. So it goes without saying that how we EQ our vocals can make or break a mix.
Poorly EQ’d vocals may sound dull, muddy, and lost in the mix. Properly EQ’d vocals should sound clear, full, and part of the song (as opposed to sitting on top of the mix and sounding disconnected from the music).
You’ll often notice that vocals sound ok by themselves, but as soon as you put them into a mix they sound dull and muffled, and it doesn’t sound like they’re sitting in the mix. Even when you bring up the level, it may sound louder, but it doesn’t sound like it’s “in” the mix, it sounds like it’s on top of everything. EQ will help you to solve this.
We’re not going to get into too much detail about EQ here, I just want to give you a really simple 3 step method for EQing your vocals that will work in 80 – 90% of situations. Seriously, most of the time this will do the trick!
What you’ll need: A parametric EQ plugin with 3 or 4 bands (places you can adjust the EQ). You want an EQ that gives you various filter options – a low cut, shelving filters, and bell-curve filters. If you’re not sure what these are yet, read on and it should make more sense…

Sign up free for my Vocal Mini-Course.
Join me for my Vocal Mini-Course where I'll be sharing with you some of my best tips, tricks, and insights, into producing great sounding vocal tracks from home. Did I mention it's totally free? :) Click below to sign up now.
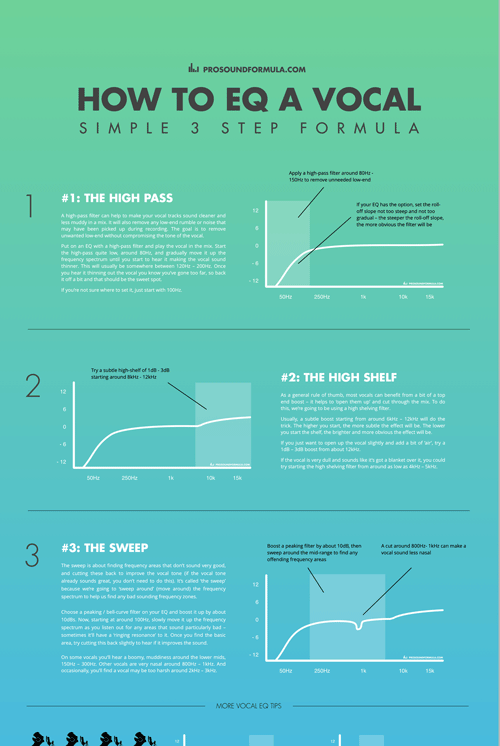
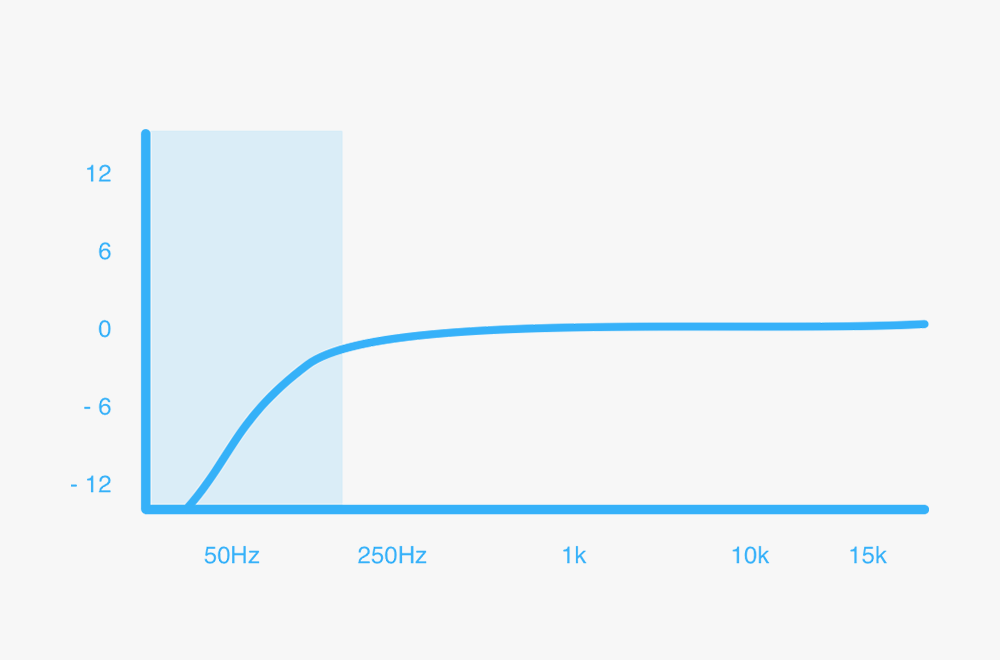
#1. “The high pass”
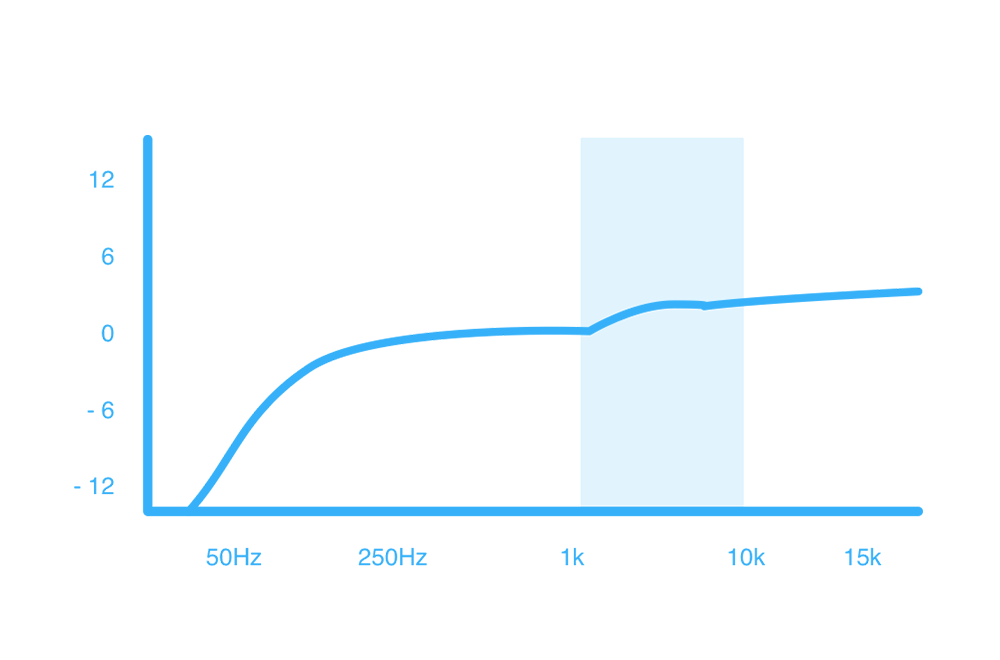
The first step to EQing your vocals is to apply a ‘high-pass filter’ which will remove any low end rumble or noise.
The first thing I do when putting an EQ on a vocal track is switch on the ‘high-pass filter’, also known as a ‘low cut’.
It’s called a ‘high-pass filter’ because it allows the high frequencies to pass through it untouched, while it removes the low frequencies. A ‘low cut’ is exactly the same thing, it’s just saying it the other way around.
Use whichever term sounds simpler to you. The bottom line is, we’re removing the low frequencies without touching the higher frequencies.
A high-pass filter can help to make your vocal tracks sound cleaner and less muddy in a mix. It will also remove any low-end rumble or noise that may have been picked up during recording.
The way a high-pass / low cut works is it rolls off (removes) all the frequencies below a certain point.
Apart from plugins, you may have come across a high pass filter on a sound desk, a microphone, a preamp, or on your audio interface. Usually, they’re in the form of a button or switch you can turn on or off. While there’s nothing wrong with using these fixed high-pass filters, they’re typically set to a specific frequency which you can’t change – usually somewhere between 75Hz and 100Hz.
“A high-pass filter can help to make your vocal tracks sound cleaner and less muddy in a mix.”
Most decent EQ plugins not only give you a high-pass filter, but they allow you to choose at which point you want the high pass filter to start, and how gradually you want to roll off the low frequencies. This gives us more control and allows us to remove as much low end as possible without affecting the tone or warmth of the vocal.
And that’s a key point – we’re not trying to remove all the low-end or make the vocal sound thin, we’re just taking away frequencies that aren’t going to be missed in a vocal track, mainly the sub-bass.
The only time you might not want to use a low-cut is if you’re recording a voice over and you specifically want a very big, bassy sounding vocal. For example, that big bassy voice you always hear on those epic action movie trailers.
However, when it comes to a vocal in a song, too much low-end will just make the mix sound muddy. So, here’s the steps you want to take…
The steps:
1. Put an EQ on the vocal that has a high-pass filter. Switch it on and play the vocal in the mix.
2. Start the high pass quite low, around 70Hz, and gradually move it up the frequency spectrum until you start to hear it making the vocal sound thinner. This will usually be somewhere between 120Hz – 200Hz. Once you hear it thinning out the vocal you know you’ve gone too far.
3. Next, we’re going to back off the high-pass so that it’s just removing the low end without compromising the vocal. Move the high-pass filter back down the frequency spectrum until you don’t hear it anymore. Test this by bypassing and enabling the EQ – you shouldn’t really hear that much of a difference while listening to the vocal in the mix. At best, it should just sound a bit cleaner and clearer when it’s turned on.

#2. “The high shelf”
Step 2 in the 3 step vocal eq formula is to apply a high shelving filter to the vocal in order to open it up and make it bright enough in the mix.
As a general rule of thumb, most vocals can benefit from a bit of a top end boost – it helps to ‘open them up’ and cut through the mix. To do this, we’re going to be using a high shelving filter.
“As a general rule of thumb, most vocals can benefit from a bit of a top end boost.”
A shelving filter gets its name from the fact that it looks kind of like a flat shelf – I know, not rocket science! Basically, a ‘high shelf’ allows you to adjust all the frequencies above a certain point, and a ‘low shelf’ allows you to adjust all the frequencies below a certain point. We’re going to be using a ‘high shelf’ to adjust the high frequencies.
You can also use a peaking filter (a.k.a. bell curve), but shelving filters tend to sound more natural for high (or low) end boosts as they affect a larger area of frequencies.
Note: You’ll find that some EQ’s have fixed frequency shelving filters – which means that you can’t change the starting frequency (usually set around 10kHz – 12kHz) – you can only turn them up or down. These EQ’s aren’t better or worse, they just don’t give you as much control as one which you can set the shelving filter to start wherever you like. If possible, use an EQ that has a variable shelving filter so that you can adjust the starting frequency.
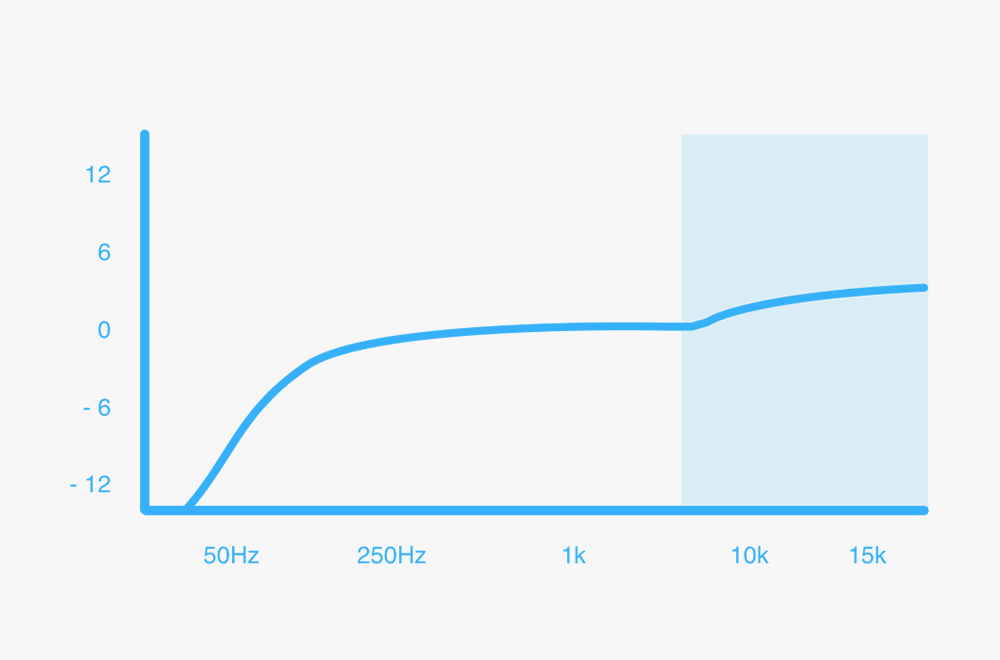
Usually, a subtle boost starting from around 6kHz – 12kHz will do the trick. The higher you start, the more subtle the effect will be. The lower you start the shelf, the brighter and more obvious the effect will be.
If you just want to open up the vocal slightly and add a bit of ‘air’, try a 1dB – 3dB boost from about 12kHz or so.
If the vocal is very dull and sounds like it’s got a blanket over it, you could try starting the high shelf from around as low as 4kHz – 5kHz.
The steps:
1. Switch on the high shelving filter and boost it up by about 5dB so that you can clearly hear what it’s doing to the sound.
2. Move the high shelf filter’s starting point around between about 5kHz and 12kHz to hear where it sounds best. If you’re not sure, just set it around 10kHz.
3. Once you’ve found the spot, drop the filter gain down until it sounds natural and not too bright. Make sure to listen to the vocal in the mix as that’s how people are going to hear it! You can then adjust the starting frequency again if you like.
#3. “The sweep”
The third and final step is called ‘the sweep’ because we’re going to ‘sweep accross’ the frequency spectrum to hear if there are any offending frequencies that could be cut back slightly.
Have you ever listened to a vocal track that doesn’t sound quite right, but you don’t know how to fix it? Well, the ‘sweep method’ may be just what you need!
The sweep is about finding frequency areas that don’t sound very good, and cutting these back to improve the vocal tone (if the vocal tone already sounds great, you don’t need to do this). It’s called ‘the sweep’ because we’re going to ‘sweep around’ (move around) the frequency spectrum to help us find any bad sounding frequency zones.
The steps:
1. Choose a bell-curve filter on your EQ. Make it reasonably broad so that it affects quite a wide range of frequencies. Now, boost the gain on that filter up by about 10dB’s so that you really hear what it’s doing. It’s going to sound strange, but that’s OK for now.
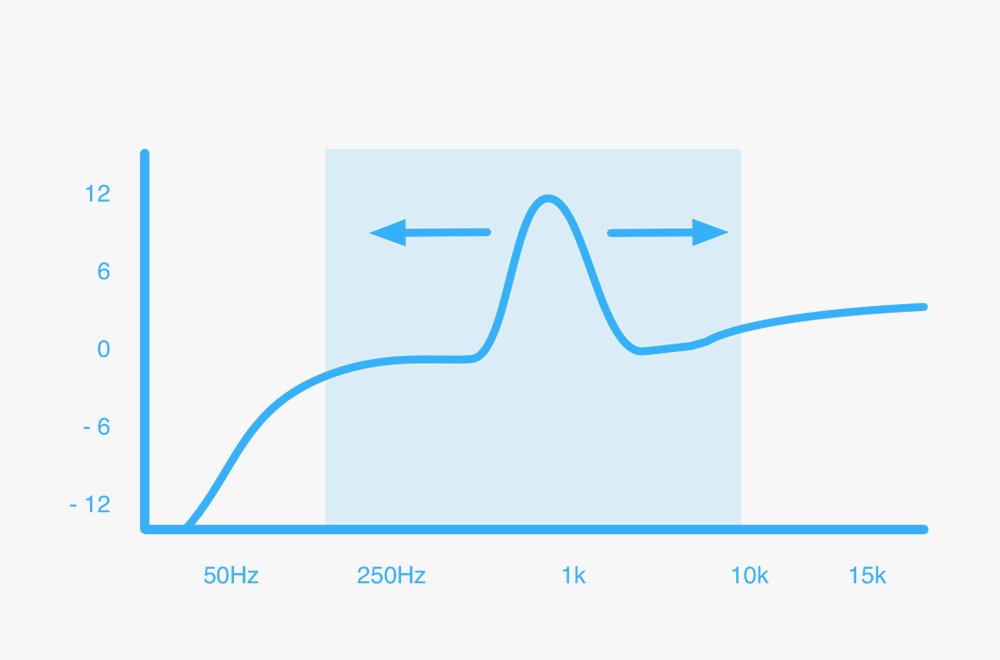
2. Starting at around 100Hz or so, slowly move the filter up the frequency spectrum. You’ll notice a strange filtering effect as the different frequency zones are boosted. What you want to listen out for are areas that sound particularly bad. You may notice a ‘ringing’ kind of resonants in certain areas that just sounds really bad – that’s the jackpot!
On some vocals you’ll hear a boomy, muddiness around the lower mids, 150Hz – 300Hz. Other vocals are very nasal around 800Hz – 1kHz. And occasionally, you’ll find a vocal may be too harsh around 2kHz – 3kHz.
Of course, because we’re boosting so much at this stage it’s going to sound totally unnatural and may bring out these characteristics to a certain extent, but you’ll notice when a certain area sounds especially bad.
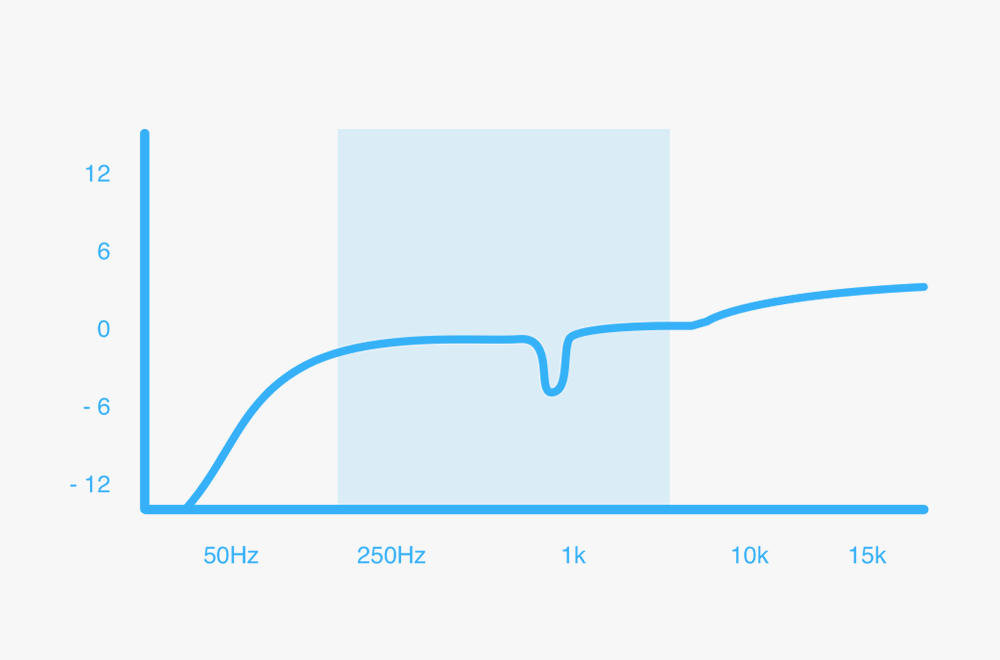
3. Once we find the basic area, we want to narrow it down and get more specific. If your EQ has this option, make the bell-curve narrower so that it’s affecting fewer frequencies. This setting will sometimes be called “Q” or “bandwidth”.
Adjust the position of the filter until you find the sweet spot again – the place where it sounds the worst. Once we find it, we want to cut these frequencies back usually using a ‘notch’ type filter. A notch filter is simply a peaking filter with a very narrow bandwidth. In other words, we’re only cutting a very narrow range of frequencies so that it doesn’t affect the tone of the vocal too much.
You should instantly notice an improvement – but that could be because we’ve been boosting this area so drastically. So to find out whether it’s an actual improvement, switch the filter on and off to hear whether it’s making the vocal better or not.
More vocal EQ tips
Backing Vocals EQ Tips
This same method shown here can be used to EQ backing vocals. If you want the backing vocals to be more in the background, don’t boost too much top-end. If you have several backing vocals in a big mix, they can often benefit from quite a drastic low-cut (around 150Hz – 250Hz) so that they fit in the mix without distracting from the lead vocals.
Brighter & Edgier Vocals
A boost around the presence range (about 2kHz – 6kHz) can make a vocal sound noticeably brighter and edgier – especially good for more aggressive styles of music. Just be careful adding too much as it can make vocals sound harsh. Sometimes boosting this area causes a sibilance problem so you may have to use a de-esser for that.

Vocal not sitting in the mix
If you’re having a problem with the vocals not sitting nicely in the mix, sometimes a small cut around the lower-mid frequencies can help. This problem can be caused by the vocalist standing too close to the mic while recording, or perhaps they just have a very deep voice. Try cutting around 100Hz – 300Hz to hear if this helps.
Want to improve your vocal tracks? Sign up free for my Vocal Mini-Course.
If you’ve been looking to improve your vocal tracks, and you found the video above helpful, sign up for my Vocal Mini-Course where I’ll be sharing with you some of my best insights into producing great sounding vocals. I’ll show you the 3 key ways to make your vocals SIT in the mix – instead of sounding like they’re either sticking out too much, or getting lost in the other instruments. I’ll also share with you my Vocal EQ Cheat Sheet and the go-to vocal EQ I use probably 90% of the time. Best of all, it’s 100% free :) Click the button below to sign up now.